Want to know how to transfer photos from iPhone to computer ? Fortunately, there are several easy ways to transfer photos from iPhone to computer. In this article, let’s learn how to copy photos from iPhone to Windows PC in minutes. There are several reasons to transfer photos from iPhone to computer. Save a copy to your hard drive, edit a picture, or give a copy to a friend.
Transferring photos from iPhone to PC was quite a complicated task due to their much lower compatibility. But the old problem is no longer there. This article will show you how to transfer photos from iPhone to PC quickly and easily. We’ll also show you how to do this from your Mac or PC.
How To Transfer Photos From iPhone To Computer
Here’s a secret from Microsoft you’ve never heard of. iCloud.com lets you securely store and access your photos, even from a PC. If you have a PC, sign in to your iCloud.com account with your Apple ID to view and access your photos. The downside of this method is that you can download up to 1,000 photos from iCloud.com to your PC at any given time.
1. Transfer iPhone Photos to PC With iCloud
The easiest way to transfer photos to your computer is to download them from the iCloud service. This process requires turning on iCloud storage on your iPhone. When you do this, all your photos will be securely stored there and can be accessed from any computer. When transferring to a Mac, the process is relatively easy. However, if you want to switch to a Windows PC, you need to do some preparation.
To transfer photos from iPhone to computer using iCloud, follow these steps:
- Download and install iCloud for Windows
- Please login to your icloud account, If you don’t know how to do this, follow the instructions that came with your iPhone.
- In iCloud for Windows, next to Photos, go to Options and select iCloud Photos.
- Click Done and then Apply.
Once everything is done, you can use the download icon (cloud with arrow pointing down) to view and download your iCloud photos. Besides downloading, you can also edit photos on your computer while using iCloud, and the edited version can be used on any device.
2. Import Photos From iPhone to PC Using AirDrop
AirDrop uses Wi-Fi to transfer files from iPhone to Mac and vice versa (can be used for other files too). So first you need to make sure your iPhone or iPad and your computer are connected to Wi-Fi. To transfer photos from iPhone to Mac, AirDrop also requires a 2012 or later Mac model running OS X Yosemite or later.
Here’s how to transfer photos from iPhone to computer using Airdrop :
- Open the Photos app on your iPhone. Select the photos you want to transfer to your computer and tap the Share icon
- Click AirDrop from the Share menu
- Select your computer from the device list displayed at the bottom of the screen
- If successful, “Submitted” will appear under the computer icon
- Tap Done in the upper right corner to exit the AirDrop screen
- If your computer isn’t using the same iCloud account as the iPhone you sent the file to, you should click Save when the file reaches your computer. If you use the same iCloud account, the photos will be saved automatically.
Finally, transferring files and photos from iPhone to your computer, especially your PC, is no longer a problem. Multi-platform sharing has become more convenient over time, especially in cloud services with upload/download capabilities. You’ve learned all the methods involved, including cloud services. So you can transfer photos from iPhone to your computer in no time. You can also transfer music from iPhone to computer using the two methods above.
3. Use iCloud Photos
Another way how to transfer photos from iPhone to computer Windows PC is to use iCloud Photos. This gives you access to your photos, not just on your computer, but on any other Apple device that syncs with iCloud.
- Go to Settings on your iPhone and select your name at the top of the screen
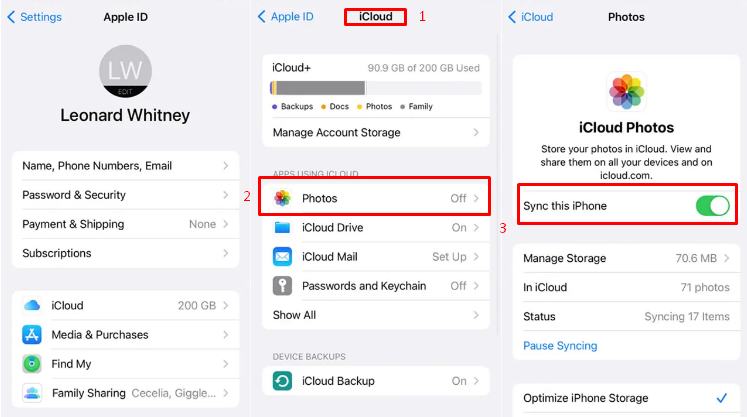
- Tap on iCloud setting, choose Photos, and then turn on Sync This iPhone. You can also tap the Shared Albums switch if you want to access or share shared albums with other people.
- Next, you will need to download the iCloud app for Windows from Microsoft Store.
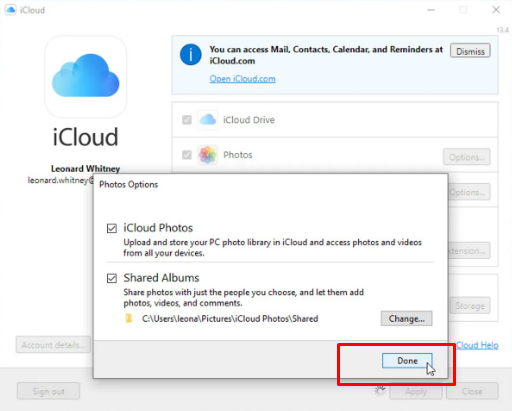
- After installation, open the app and click the Options button for Photos. Check the iCloud Photos and Shared Albums options if they are not already checked. Click Done and then Apply
- Open File Explorer and click the iCloud Photos entry. You should now see all your synced photos
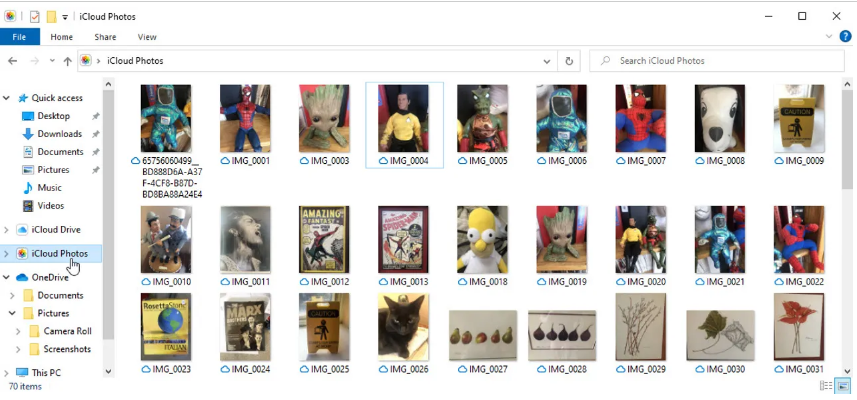
The iCloud for Windows app is a useful option for a Windows PC, but it has a few major drawbacks. The app dumps all your photos into one flat folder structure so they aren’t organized into any folders or albums you may have created on your iPhone or iCloud. Also, the app does not support true two-way sync, so if you delete a photo in the iCloud folder on your Windows PC, it won’t be deleted in iCloud or on your other devices.
Conclusion
Overall, according to the official page bacaberita the best way how to transfer photos from iPhone to computer is with OneDrive. You can use this application to transfer all files automatically. If you already use OneDrive to back up and sync files, you can save it to back up and sync photos from iPhone to PC. To set it up, download and install the OneDrive iOS app on your phone if you’re not using it. Open the app and tap on the Photos icon at the bottom. Tap the Open button for Camera Upload.
 Xabiamedia Tech in the heart
